From old to new!

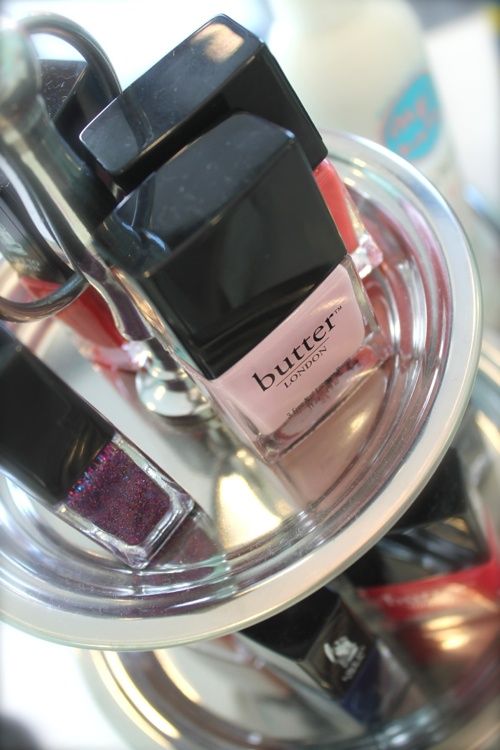
Hey guys! I've been looking around for a nail rack for quite some time online & ended up finding an old one on Kijiji for about $10. It was a bit busted up & needed a new make over! I decided to put my crafty talents to good use. First I cleaned the rack, gave it a good wipe down before I started anything. After I was done cleaning I got a blank piece of paper & used it as a measuring guide for the inside shelf. I than got some lovely vintage flowery scrapbook paper, measure it & cut out all of the pieces I needed. Using a hot glue gun I than started to glue the pieces into the slots. I also took off the 'Nail Polish" sign on top.I wanted to do something about the mirrors, so I'm thinking later on coating them with Chalkboard paint. I'm glad I did pick up this little gem! Another man's trash is defiantly another man's treasure! Hope this inspired all of you to turn something old into something new! Until next week! Xo
Labels: diy, flowers, nail polish, nail polish rack
N.A.C. Week 6 - Violet Nails!
Hey guys! It's time for N.A.C. Week - Violet Nails!
I did a spring look for this week's challenge since we finally have some sunshine! Yay!
Let's get started!
What you need:
- Base coat
- Top coat
- Purple nail polish
- Light purple nail polish
- Shimmery purple nail polish
- white acrylic paint
- Purple acrylic paint
- green acrylic paint
- magenta nail polish
- hot pink nail polish
- light shimmery pink nail polish
- toothpick
- stripper brush
- paper towel
- water
We're going to prep the nails with a base coat.
Using a base coat will protect the nails from staining.
I'm using ESSIE 'all in one base'.
Next I'm going to paint my nails in a pattern with purple, then light purple, then dark again start from my thumb. The nails should look like this. I did about 2-3 coats for each nail.
The purple is ESSIE 'boxer shorts' such a pretty color,
& the light purple is by OPI 'rumple's wiggin''.
After that is dry I'm going to put a shimmery purple over the ESSIE'S purple.
I'm using REVLON '#370 not so blueberry'.
Not only is it a nice shimmer, it also smells like blueberries once it's done drying!
Now I'm going to be using the white & purple acrylic paint. I mix them together to make a light purple, close to the color I painted on my pointer finger & ring finger.
Using a stripper brushing, I'm going to make 3 vertical lines down the purple nails.
One in the center, then 2 on the sides.
Now it's time for the flowers! I'm going to be using a magenta color to make the base of the flowers. Make sure you don't take too much polish
& just make random blobs on the nails. It doesn't have to be perfect!
I'm using ESSIE 'splash of grenadine'.
Let that dry & now we're going to apply the shimmery pink
on top of the blobs we just did.
I'm using ESSIE 'pink-a-boo'. Such a pretty shimmer!
After that is dry, I'm going to mix the magenta color & a hot pink color together to do the outlines of the flowers. The hot pink polish I used is OPI 'suzi's hungary again!'.
Now using a toothpick & going slow, were going to outline the blob. I did 3 curves that weren't attached together & put a dot in the middle on the blob. Super easy!
Make sure you wipe off the nail polish on the toothpick every now & then, to ensure the toothpick is always sharp.
Almost done! Now using green acrylic paint we're going to be doing the leafs on the flower. Start off with a dot on the side of the flower & then drag it with a curve,
you can do as many leafs on the flowers as you want but I stuck to 2-3 per flower.
Let everything dry & finish it off with a top coat.
I'm using my favorite top coat SECHE VITE 'dry fast top coat'.
Hope you guys enjoyed this weeks N.A.C. Week 6 - Violet Nails!
See you guys next week for N.A.C. Week 7 - Black & White Nails!
Labels: Canada, diy, flowers, Nail Art, Nail art challenge, nail design, nail polish, spring
From old to new!
Hey guys! I've been looking around for a nail rack for quite some time online & ended up finding an old one on Kijiji for about $10. It was a bit busted up & needed a new make over! I decided to put my crafty talents to good use. First I cleaned the rack, gave it a good wipe down before I started anything. After I was done cleaning I got a blank piece of paper & used it as a measuring guide for the inside shelf. I than got some lovely vintage flowery scrapbook paper, measure it & cut out all of the pieces I needed. Using a hot glue gun I than started to glue the pieces into the slots. I also took off the 'Nail Polish" sign on top.I wanted to do something about the mirrors, so I'm thinking later on coating them with Chalkboard paint. I'm glad I did pick up this little gem! Another man's trash is defiantly another man's treasure! Hope this inspired all of you to turn something old into something new! Until next week! Xo
Labels: diy, flowers, nail polish, nail polish rack
N.A.C. Week 6 - Violet Nails!
Hey guys! It's time for N.A.C. Week - Violet Nails!
I did a spring look for this week's challenge since we finally have some sunshine! Yay!
Let's get started!
What you need:
- Base coat
- Top coat
- Purple nail polish
- Light purple nail polish
- Shimmery purple nail polish
- white acrylic paint
- Purple acrylic paint
- green acrylic paint
- magenta nail polish
- hot pink nail polish
- light shimmery pink nail polish
- toothpick
- stripper brush
- paper towel
- water
We're going to prep the nails with a base coat.
Using a base coat will protect the nails from staining.
I'm using ESSIE 'all in one base'.
Next I'm going to paint my nails in a pattern with purple, then light purple, then dark again start from my thumb. The nails should look like this. I did about 2-3 coats for each nail.
The purple is ESSIE 'boxer shorts' such a pretty color,
& the light purple is by OPI 'rumple's wiggin''.
After that is dry I'm going to put a shimmery purple over the ESSIE'S purple.
I'm using REVLON '#370 not so blueberry'.
Not only is it a nice shimmer, it also smells like blueberries once it's done drying!
Now I'm going to be using the white & purple acrylic paint. I mix them together to make a light purple, close to the color I painted on my pointer finger & ring finger.
Using a stripper brushing, I'm going to make 3 vertical lines down the purple nails.
One in the center, then 2 on the sides.
Now it's time for the flowers! I'm going to be using a magenta color to make the base of the flowers. Make sure you don't take too much polish
& just make random blobs on the nails. It doesn't have to be perfect!
I'm using ESSIE 'splash of grenadine'.
Let that dry & now we're going to apply the shimmery pink
on top of the blobs we just did.
I'm using ESSIE 'pink-a-boo'. Such a pretty shimmer!
After that is dry, I'm going to mix the magenta color & a hot pink color together to do the outlines of the flowers. The hot pink polish I used is OPI 'suzi's hungary again!'.
Now using a toothpick & going slow, were going to outline the blob. I did 3 curves that weren't attached together & put a dot in the middle on the blob. Super easy!
Make sure you wipe off the nail polish on the toothpick every now & then, to ensure the toothpick is always sharp.
Almost done! Now using green acrylic paint we're going to be doing the leafs on the flower. Start off with a dot on the side of the flower & then drag it with a curve,
you can do as many leafs on the flowers as you want but I stuck to 2-3 per flower.
Let everything dry & finish it off with a top coat.
I'm using my favorite top coat SECHE VITE 'dry fast top coat'.
Hope you guys enjoyed this weeks N.A.C. Week 6 - Violet Nails!
See you guys next week for N.A.C. Week 7 - Black & White Nails!
Labels: Canada, diy, flowers, Nail Art, Nail art challenge, nail design, nail polish, spring